
Showing posts with label Aubrey's Scrapbook. Show all posts
Showing posts with label Aubrey's Scrapbook. Show all posts
Saturday, March 31, 2012
Preschool


Monday, March 14, 2011
A is for Aubrey
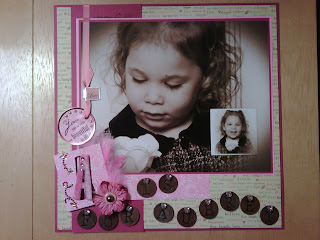
This LO is of a photo I had taken on my DD's 3rd birthday. These days she's been all about saying "A is for Aubrey!" so I thought it would be a fun title for this page. The background paper has lots of endearments written in different fonts and colors, this is where I pulled my accent colors from. The quote tag says "You make me realize how beautiful my life is." Its a clear sticker that I placed on some accent paper and made a tag out of using Making Memories' tag maker. I then added pearl halves and an eyelet through which I ran a ribbon and a dangling tag fastener and adhered the ribbon to the photo. The "A" and its background are made from a chipboard die cut that I overlayed with accent paper and embellished with flocking and rhinestones. I used puffy tape to elevate the actual "A" above the background. I also added a pink feather to the side and then of course a few paper flowers with an enamel brad topped with another half pearl (this one in a wine color). The rest of the letters in the title are made from weathered looking copper-like colored metal tags. They are attached to the page using rhinestone snaps. I have left a location for a journaling tag should I decide to add one in the future. It is located behind the photo and will be attached using an embellished paper clip.
Monday, February 21, 2011
Are You My Mother?

This LO is of our very first studio photo together. This photo was taken on my DD 3rd birthday last month. The title of the page 'Are You My Mother?' is the name of a popular book by P. D. Eastman about a just hatched baby bird in search of his Mother, whom is off fetching food for her new baby. This was my favorite book as a child, and is quickly become one for my daughter also. We read the book several times a week. Ironically I also call my DD little bird, and have since she was very young. She used to have her mouth open real wide during feeding time and it reminded me of a baby bird.
The title was fun. I used a journaling page from a journaling book (that's the scalloped edged red and white piece) for the base of my title and then built it up using tons of different rub-ons. I used two blank chip board rectangles that I inked up and printed the title on using a Glitter Gel Pen (that I got from the dollar store!!) and ink/stamps, along with a few more rub-ons. DO you see the tiny bird? The title is very dimensional IRL and is one of my favorite titles ever.

The background paper was "Bohemia" and double sided coordinating prints. I put two sheets together and folded down the top right corner to create a pocket are for my journaling. There I decorated the space using more rub-ons (Basic Grey here I think), a bedazzeled brad and a flower shaped grommet. The large red bird and its branches were preprinted on the background paper. The pink part of the journaling tag is a die cut from a journaling book, and then I cut around it with the red paper (that has "love" written in different languages).

Here is a close up of the top right corner of the photo, and of the journaling pocket. The photo corner was embellished with several layers of rub-ons (clearly I love rub-ons), ribbon, flowers, a large brad and what used to be a bird lapel pin. I pulled the pin part off and glued it on. Obviously the bird theme is big on this LO. I also tried really hard, and was surprised to see I succeeded, to pull in polka-dots along with lots of reds, pinks and browns into this LO. I think the little bird pin near the photo just completes the LO. I really had a good time with this page, and maybe I went a tad overboard since it ended up looking a little busy. But in the end, I love it and I think its one of my best pages.
Thursday, February 10, 2011
3 Years

This page is in honor of my daughter's third birthday. The background has silver writing in the paper itself, which was so cool! The writing says "You are a blessing beyond compare". I used silver ribbon, stickles, a silver gel pen (which was such a cool pen and added some real glam!) and pink crystals to accent the page. The black silhouette of the branch and bird were cut out using the Silhouette Machine. I often call her my "little bird" and enjoy putting birds on her layouts. I used silver ribbon in the birds wing, and pink Stickles in the flowers and as the eye of the bird. This picture was taken at the studio on her 3rd birthday. The journaling is about this past year and how she has changed and who she has become.
Saturday, January 23, 2010
1st Birthday
 This LO is of my daughter's first Birthday. I was trying to make the one picture the main focus of the LO with out distracting from it with the ten or so photo's I wanted to use. Now that I am done, I think I would have preferred the same background paper on both sides. Anyhow, I had fun adding some elements to the page that came from the actual day, such as the ribbons and the cupcake.

The huge "1" is something I think that was originally intended for use on a quilt. It is fuzzy and made of fabric. The title is a rub on that I embellished with Stickles (I love my Stickles) and attached a plastic "button" to that which says "Sparkle". The button on the top of the hat is a fabric covered button, and the ribbons are ribbons that came from Aubrey's actual birthday dress, as did the Cupcake applique. I added the green "pearl" to the top. The large "27" rub-on is from Gin-X Express-ons, and "Jan" are foil letters. The background paper is from Imaginisce from the All Kinds of Happy line called Tied up with Strings

There are several photo's on this page that are under peek-a-boo flaps (see below photo). The background paper and the two upper "gifts" are also from the All Kinds of Happy line. I used Parfait Par-tay for the background, Chatty Cake, Chatty Cake on the pink gift and Oooo, You Shouldn't Have... on the gift bag. The gift bag has a few pictures in it with pull-up tabs made from Vellum to resemble tissue paper. The Vellum is from Paper Pizazz. I cut the edges using decorative scissors and the ribbon is also from Aubrey's birthday dress. The brown and pink "Happy Birthday" ribbon is Martha Stewart Crafts. Each flap (other than the gift bag) opens or rotates to reveal several pictures beneath. I embellished with ribbons, charms and rhinestones. The small purple envelope at the top was made using the Cricut Cartridge called Wild Card. I added stickles for depth and pizazz and used a Zig Millennium Pen to add her name. The envelope is secured to the page using the tiny white clip at the top and is easily removable. Inside the envelope is a card with the journaling of the day on it.

This photo displays how the peek-a-boo flaps open to reveal the photo's. There are a few photo's under every flap. I really enjoyed how this LO took on a mind of its own and revealed a nice new idea for me to add several pictures to one page without making the page feel overwhelming. And now, 4 days shy of her 2nd birthday...I have finished! :s I really need to pick up the pace.
Saturday, January 9, 2010
Trick-or-Treat


Here is what the LO looks like together. It's a double page LO. This page gave me a lot of grief, but in the end I am very pleased with the way it turned out. Thanks to some .svg files I used (for the title and the monkey) on my SCAL, and some pretty great embellishments I picked up in the weeks I was working on this LO. It seemed so plain brown to me, and blah. And it took me forever to find a Monkey that I liked. This monkey wasn't my favorite, but it was cute enough. I got the Monkey .svg file from Southern Belle and I got the title .svg file from http://www.svgcuts.com/ (who had some really great ones!!).
So the title and monkey are cuts I did on the Cricut. The title paper is by American Crafts, The Goods Collection in Pumpkin Pie. I used the stripes on the front and the back is a coordinating color that I used for the shadow of the title. Then I used a few sticky pearls from Recollections, along with several of the stickers. The spiders body is one such pearl, and then I used black Stickles on the spiders legs, and some little doodads here and there through out the LO. I put two photo's on tags that are hidden beneath the top three photo's. I had a lot of photo's I wanted to use for this LO, being that it was my daughters first "real" Trick-or-Treating experience.
My favorite part of this LO is the journaling tag. I found this cute little .bmp in Microsoft Word. I inserted the picture, enlarged it and then wrote on it using a text box, printed and then cut out the image by hand. A daunting task, there are 7 pages. Hey, I'm a wordy gal! The top flap opens up to reveal the other 6 journaling flaps, telling the story of the day. The font I used is called Dilate. I used foam tape behind the upper part of the bag to give it a 3D effect, and to also allow room for the thickness of the other 6 pages of journaling. I used black Stickles on the ghosts eyes and highlighted them with blue pearls from Recollections. The Happy Halloween Stickers, tag and candy are also from Recollections. The black dots around the large photo are "brads" that I made using black Stickles. I later added two small ghost stickers. I really recommend clicking on the images to get a closer look, I really am proud of the details in this LO. And happy to be moving on...
Journaling says:
" We went all over town today for Halloween fun! I think the fun was more for Momma's sake than any one else's. First thing this morning we went to a little costume parade on Grosse Ile, and Grandma joined us. I was dressed up in a little monkey costume and thirteen layers of clothes because it was so cold and the wind was whipping. Later that day we went to a little Boo Bash that had Pony Rides. I got to sit on one of the Ponies, my first time ever!! Then we went to visit Great Grandma and Auntie Maddie. Who just think I'm the cutest thing EVER!! Later that day we were off Trick-or-Treating in our neighborhood. I went last year, when I was only 9 months old, In Niles with Momma’s Family. This year I got to walk around and carry a little pumpkin and beg for my own candy (which Momma has already confiscated and probably eaten). We took Kaida too! Daddy walked Kaida, but I tried my hardest to get him to let me do it. In the end I let him “help” me. I had so much fun! We crunched through the leaves up and down my street. I even put some in my pumpkin. Daddy threatened people not to scare me, I got tons of candy, chips and cookies, went for a nice walk in a fun costume and saw lots of little kids and even dogs that were dressed in funny costumes. Then we went back to our home and passed out candy for a little while before I had to go to bed. I loved seeing all of the kids dressed up and coming to the door saying "Trick or Treat". Every time Momma said, "Muffin, someone’s coming!!" I ran to the door to see. Kaida did too! It was such a fun day, but when we were all done I was pooped!! I think Momma and Daddy had as much fun as I did, if not more. It is possible that they were also more excited than I was, especially Momma. I think she may have been holding back tears while we were Trick-or-Treating!! I am 21 months old. 2009"
Thursday, October 29, 2009
Say cheese!

This lo is of Aubrey at 16 months. Its her second trip to a studio. The background is a denim print, one which I never thought I would use! I was also lucky enough to find some accent paper in one of my stacks that coordinated with her shirt in the photo. Then I used die cuts for the corners and embellished them with gems and these little metal confetti flowers. I also used die cuts for the title and the embellishments around the journalling tag. There are scatterings of stickles on some of the die cuts and the white run on flowers and swirls. I also hid a little rub on bird on the journalling tag.
The Sweetest Thing

Sent via BlackBerry from T-Mobile
Wednesday, October 14, 2009
Halloween 2008

This page was super fun! I bought the background paper last year right after Halloween. But I found the overlay just recently. So I was glad to have waited to scrap this page. The background paper is shimmery which adds a really fun element to this page IRL. I Cut around the tops of the pumpkins so that the picture could slide behind it. Then I added the coordinating ghost rub-on. I cut the picture into a circle so that it would fit inside the spider web frame on the overlay. I used coordinating bg paper to matte the photo. It also shimmers. I wrote the title and date directly on the photo. Then I attached the overlay. The overlay is a transparency that has orange dots around the edges, and has a frame made from spider webs, along with the swirls and spiders. I attached teh overlay using black and orange brads in 2 sizes. I outlined the spider web parts with Black Stickles with adds depth and a great wet sparkle look IRL. I loved how that turned out! I went over the spiders bodies with Orange Stickles to make the spiders pop off the page. I then added more coordinating pumpkin and ghosts rub-ons to the overlay (and yes they stuck with ease). Below is the tag (hidden in the upper left corner of my layout). I used white ink and stamps, a white pen, and more of the rub-ons and brads to decorate the tag. I really loved how this LO turned out. Its not often that you buy an overlay that you can embellish and make your own. I just love the Stickles on it. And I was happy and surprised to see that it didn't warp my overlay. And surprised to see that the rub-ons actually stuck to the overlay.

Wednesday, August 12, 2009
Swinging

This has to be one of my all time favorite photos of my daughter. She loves to swing. This is her on the up-swing. There isn't any journaling, just a vellum quote that says "The world belongs to the enthusiastic!" which I thought really hit home with this photo. My daughter really is very enthusiastic, especially about swinging. The background paper was just white card stock that I chalked swirls on (using a template called "swirls and vines" by www.thecraftersworkshop.com) I tried to bring the blue in her shirt and the swing out. Then I used pink cardstock to bring out the little bit of pink in her undershirt. I used double photo corners in a navy and a vivid blue, then accented the pink and blue using flowers, brads and ribbon. There is a snap in teh center of the bow that says "joy". The star brads are glittery. I wrote the date on the photo using Uni-ball Signo borad pen in white. It's like a gel pen. It's pigment ink. It worked lovely and I love this pen. It left a textured feeling to the photo.
Sent via BlackBerry from T-Mobile
Pool Fun
I had a lot of fun with this LO. This was the first time I took my daughter to a pool. She is standing in one of the water spouts. I can not believe I captured the picture, much less on my camera phone...the best invention since sliced bread. I used a plain vivid blue colored background to match the flowers in her bathing suit. Then I overlaid the background with a white vellum sheet with vivid blue flowers. I used Stickles on flowers here and there to make them pop off of the page. I cut a "frame" into the vellum sheet where I put my photo on a skew. I attached ribbons, flowers, brads and charms to create a "frame" around the photo. The title says "Pool Fun" and is made from chipboard with glitter and swirls. The U in "fun" is doubled up on for dimension. The frog on the bottom right corner is from an old pin that I've had for years. The brad in the center of the flower says "Silly" on it. I thought that was so fitting! I also used white brads here and there as the flower centers to attach the vellum to the background. There is a tiny blue flower charm attached to the white ribbon that hangs down on the left.

The tag goes through a cut out in the vellum and slides behind the photograph. The tag is white cardstock that I inked the edges blue and added a blue rub-on border on the left along with some ribbons and left over chipboard pieces from the title to create the pull tab. There are also a circle sticker on the bottom right of the tag that says "Be Silly - Be Goofy - Be you" that I thought fit her so well. The vellum quote says "Live in the sunshine." and then I journaled about the day and it's events.

Wednesday, June 3, 2009
Great Expectations

This is a LO for my sons book. This was our first "family" picture of all "four" of us. This is the day we found out we were pregnant with my son. You can clearly see how tired I am. My daughter is wearing a shirt that says "Big Sister" as this is how we broke the news to the Grandparents. The title is made out of Rub-ons. The hearts were cut out using the Cricut. The journaling is between the two hearts in a pocket. The idea there is that my sons story is forever held between our two hearts (my husbands and mine). There are several rub-ons that blend in with the BG, though IRL they stand out a lot more. The swirls at the top and bottom of the photo are chipboard that I inked the edges on. There is a rub-on located in the bottom right of the photo that says "Family", that is not a tattoo on my arm, though it certainly looks like one.
Rolling Over

This LO is of my daughters first attempt to roll over! She was 3 weeks old. I loved the loud colors of the BG paper that pulled loud colors from the tummy mat my daughter is on. I used the Cricut to cut out the title in one large piece. The title is supposed to look like it is rolling over the
picture's edge. The journaling is on an oversized tag and tucked behind the photo. IRL the main colors are bright pink and orange and a softer green. I was so glad to find flowers and ribbon and brads in my personal stock. I think they play off of the colors very nicely. I thought this was a fun page.
Baby

This LO is for my daughters book. This is probably my favorite LO of all times. It was also the easiest. It's just a nice piece of paper, a B&W photo and a transparent overlay. Most of the decorations are on the overlay. I took a picture on an angle so that you could read the poem on
the right with out a glare. This is also one of my favorite pictures!
Monday, June 1, 2009
Diaper Duty

This LO is from my daughters book. The title was cut with my Cricut. As you can tell, I love using the Cricut. I inked the edges of each letter so that they would stand out better. The diaper opens and inside contains the journaling which talks about how my husband changed every diaper while we were in the hospital (and he was there) and how I didn't change my first poopy diaper until we were home, at which point he had to show me how to "clean" her properly. The diaper is cut from a vinyl like paper, so IRL it feels like leather. There are clear ghost flowers on the edge of the picture and I used some white rub ons on the photo itself too.
First Bath

I loved doing this LO. This is my daughters first bath! For the title, the "first" part is made with rub on letters that have pebble stickers over the top, to resemble bubbles. Then on the word "bath" I used Stickles to also represent bubbles, and the letters are "ghost" letters which are plastic. There is a small rubber duckie rub on in the bottom right hand corner of the photo that I thought was to die for. I also used Stickles to highlight the bubbles in the bathtub and floating up the side of the LO. The bathtub is an embossed vellum diecut that couldn't have been more perfect! The little duck at the top of the journaling tag is fabric and I used puff ink to write the journaling.
The First Week!

This is the first week my daughter was born. I rated each day and journaled on little tags that I tucked into numbered pockets with cooresponding pictures. I used a few white rub ons. I love rub ons. This LO was actually my husbands idea, and I love it. I like having a little snippet of
what each day was like in the first week of my daughters life.
Introducing Aubrey

This is from my daughter's scrapbook. This is her birth picture. I had a lot of fun with this page and it's colors. I used puffy ink on the journaling tag. I used the cricut to cut out the title. This is also the title page of her personal scrapbook.
Subscribe to:
Posts (Atom)


 Posts

